
Texture shots in Product Photography are a crowd-pleaser. Everyone loves them, every brand wants them!
But they aren’t as simple as they look.
Just a bit of product smeared on the surface, right? No!
I’ve tried and tested various methods to take texture shots so that now you don’t have to try all of them.
I’ll tell you exactly what you need to nail the shot.
Table Of Contents
Simple guide to nailing texture shots in product photography
Gather up the things you’ll need
Here’s a quick reel to get the gist of it.
Also Read: Things Every Product Photographer NEEDS | GarimaShares
Get the perfect backdrop
On which surface are you going to spread your product?
You can’t use paper backdrops, backdrop boards, glass, or acrylic sheets.
Paper backdrops will get soggy and the texture won’t stay on it for long. After sitting on it for a while, the backdrop may even tear.
Backdrop boards can get stains from the products which might not come off.
If you use a glass or an acrylic sheet, you’ll have to spend a lot of time managing your source of light since it’ll be reflected on their glossy surface.
Plus your own shadows will pop up on the surface.
The answer you’re looking for is…
Vinyl Backdrops!
Believe me, once you use a vinyl backdrop it’ll be hard to pick up a paper backdrop again for product photography.
They’re so easy to clean, waterproof, and they don’t tear up or wrinkle that easily.
I bought a set of 3 vinyl backdrops from amazon. I wasn’t sure of the quality but since the price was pretty decent, Rs. 999, I chose to give it a shot.
And I’m not disappointed at all!

The 3 vinyl backdrops you get are printed on both sides. So, actually, you are getting 6 backdrops in Rs. 999.
That’s only Rs. 166 per backdrop which is crazy as most backdrops are priced above Rs. 1000. (For a single one)
Are you looking for better pictures for your brand? Email me and let’s chat.
What kind of products will you need?
If you’re taking a texture shot for a brand’s project, using their own products for it is a clear choice.
But if you’re just taking one for practicing or for Instagram here’s what you’ll need.
The key is to textures build with products of different consistencies.
Check out my Pinterest board for ideas for texture shots.
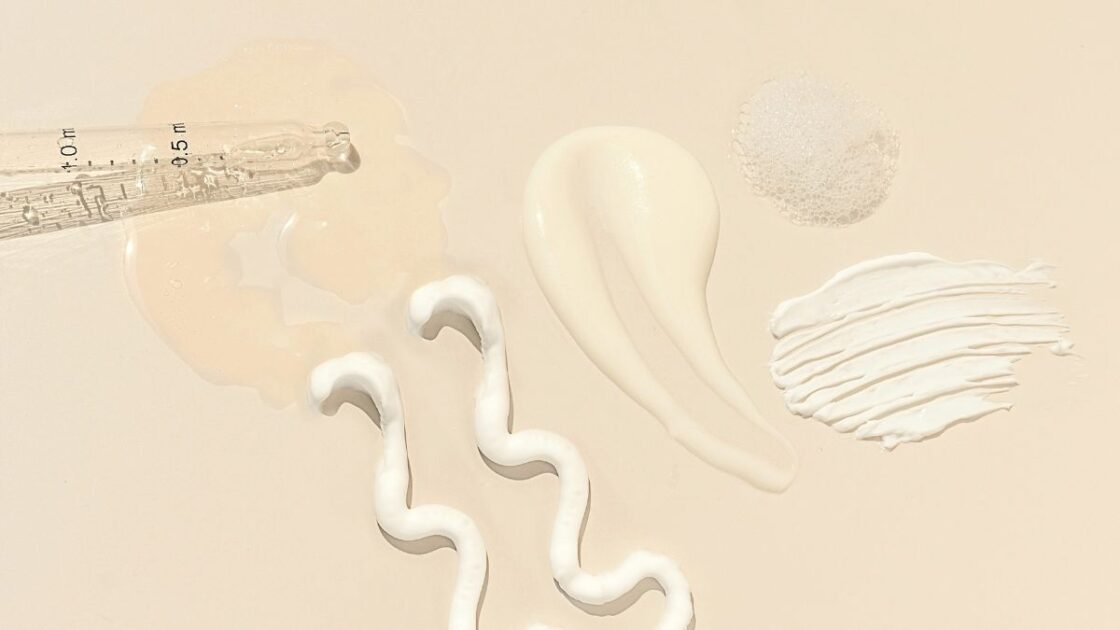
For example, let’s look at this shot.
There are bubbles on the top-most texture, foam-like. You can create this with a body wash or shampoo.
The stroke in the center is a thick cream, probably a moisturizer or a hair conditioner would do.
The yellow circle on the right is most definitely a kind of oil. Working with oil is tricky so make sure you try out the oil on another surface first.
Check if it retains the shape for a while so that you can take a picture. If not, you need to find another oil.
Make sure to use a different color of product too to keep the picture interesting. Shaving foam is a great option too.
Also Read: Affordable Photography Courses Worth Checking Out | GarimaShares
Creating the texture
You can use items like a spoon, spatula, your fingers, or fork.
Keep a damp cloth near you to wipe off and refine the spread.
Lighting
The best lighting option is a strong bright light. It can either be a strobe, such as Godox FV150, Godox FV200, or simply harsh daylight.
Godox SL60W is a more affordable option than the strobes, but it’ll be less bright.
The picture I showed you earlier in the post, I shot in daylight itself.
You’ll need a thermocol sheet/whiteboard to soften the shadows.
And that’s all! If you have any questions, comment down below.

Subscribe to never miss a post!
Leave a Reply