
Product photography is the backbone of e-commerce and brand marketing.
High quality images not only make your products look appealing but also build trust and influence purchase decisions.
While many photographers rely on artificial lighting kits, some of the most captivating results come from something completely free and accessible—natural light.
Knowing how to master product photography in natural light can elevate your images and make them look professional, authentic, and persuasive.
Natural light has a unique character. It brings softness, depth, and realism that often feels more natural than artificial setups.
It is also budget friendly, making it an excellent choice for small business owners, creators, and photographers who are just starting out.
The key lies in understanding how light behaves throughout the day and how to shape it for your creative vision.
Table Of Contents
Why natural light is perfect for product photography
Natural light enhances textures and true colors, which is critical for building customer trust.
When people shop online, they cannot touch or feel the product. They rely on visuals to make their decision.
A product photographed in natural light feels more genuine and relatable, creating a stronger emotional connection with potential buyers.
Soft daylight reduces harsh shadows, highlights details, and gives an overall pleasing look to any item, whether it’s fashion, food, or lifestyle products.
Another advantage is the versatility.
Morning light creates a gentle and fresh look, midday shade offers clean brightness, and golden hour adds warmth that can make lifestyle-oriented product shots glow.
Unlike artificial lighting, you do not need complex setups or expensive gear. A window, an outdoor space, or a shaded area is often enough to achieve professional looking results.
Finding the best light source
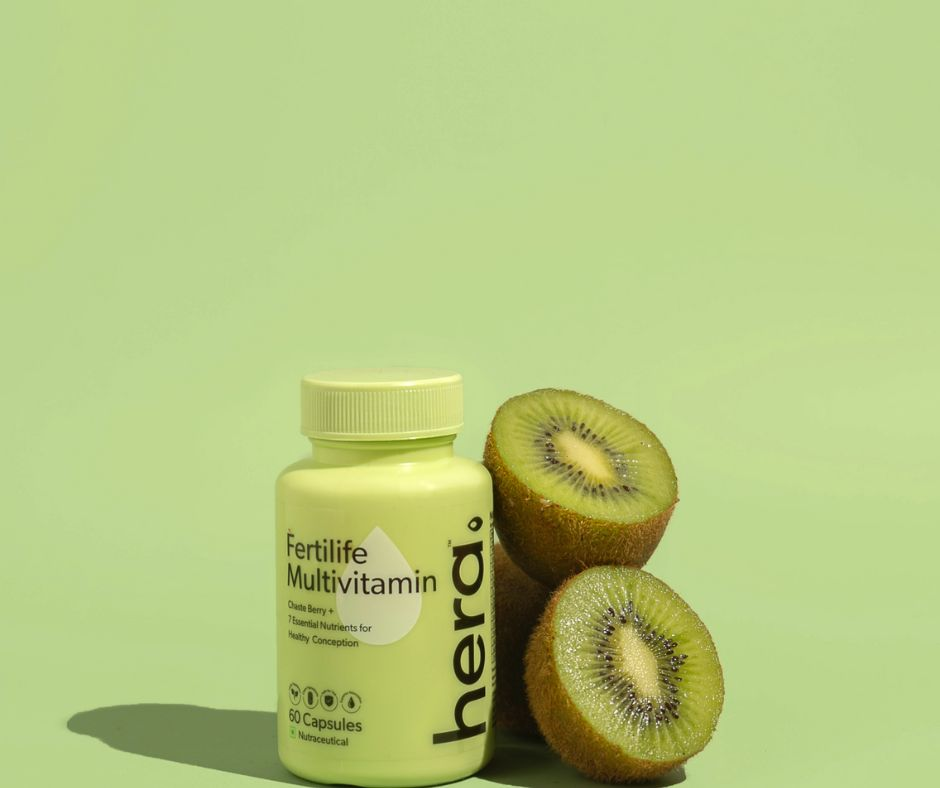
I shot these photos (above) in natural sunlight, placed near a big window in a balcony.
The foundation of successful product photography in natural light is choosing the right location.
A large window that allows soft, indirect light is often the best choice indoors. North or east facing windows provide consistent brightness without the harsh glare of direct sun.
Outdoors, shaded areas such as balconies, verandas, or spaces under trees create even lighting conditions that prevent blown out highlights.
The direction of light also matters.
Placing a product at a slight angle to the light source adds depth and dimension.
Shooting directly in front of a window may flatten the image, while positioning the product at around forty five degrees helps reveal shape, texture, and detail.
Also Read: 7 Creative Product Photography Ideas For Serums, BONUS – Reels Inspo!
How to control natural light in product photography
Although natural light is beautiful, it is not always predictable. A simple sheer curtain or a white fabric can soften strong sunlight and turn it into a diffused glow.
Diffused light is flattering for most products because it reduces harsh shadows and keeps colors balanced.
For further control, a white foam board or even a piece of cardboard wrapped in aluminum foil can be used as a reflector to bounce light back onto the darker side of the product.
Learning to manipulate natural light with inexpensive tools makes a significant difference in the final outcome.
This step separates amateur looking images from professional ones and ensures consistency across multiple product shots.
Also Read: Hollyland Lark M2 Duo: Best Wireless Mic That Does It All
Choosing the right background

A background should enhance the product rather than compete with it.
For clean catalog images, neutral tones like white, beige, or soft grey work best.
They reflect light evenly and keep the focus on the subject. For lifestyle shots, textured backgrounds such as wooden tables, stone surfaces, or fabric backdrops can add personality and context.
The important point is to maintain harmony.
A product image should never feel cluttered or distracting. Simplicity often communicates professionalism and lets the product shine.
The importance of angles
Angles determine how a product is perceived.
A front facing shot highlights packaging, a forty five degree angle reveals dimension, and a top down view works perfectly for flat lay arrangements.
Close ups can be used to emphasize texture, details, and craftsmanship.
In product photography in natural light, angles combined with soft daylight can create storytelling elements that make the product more appealing.
Shooting multiple perspectives is always recommended since buyers want to see every aspect before making a purchase.
Also Read: 7 Ultimate Skincare Product Photography Ideas To Improve Your Brand’s Image
Managing shadows
Shadows are a natural part of working with daylight.
Instead of eliminating them completely, the goal is to control and use them creatively.
A reflector or a second light source like a nearby wall can help soften unwanted dark areas.
Sometimes shadows can add mood and depth, especially in lifestyle product photography.
For instance, dappled light filtering through leaves can create an artistic touch for beauty or fashion products.
The key is to ensure that shadows never overpower the subject.
Styling and props
Props can bring life to product photos, but they must always support the product rather than distract from it.
In natural light, where every detail is visible, minimal and thoughtful styling is often most effective. Props should complement the colors and textures of the product.
For example, a handmade soap bar can be styled with fresh leaves or towels, while a coffee product might look inviting next to scattered beans. Negative space is equally important.
Leaving breathing room around the subject creates balance and draws attention to the product itself.
Camera settings for natural light product photography
Both professional cameras and smartphones can produce excellent results if settings are optimized.
Keep ISO as low as possible to maintain image clarity and avoid noise.
Aperture can be adjusted depending on the look you want, wider for blurred backgrounds or narrower for crisp detail across the frame.
Shutter speed should balance exposure without causing blur, so using a tripod is recommended in lower light situations.
White balance should be set to daylight to ensure colors remain true. Correct technical settings combined with natural light create sharp, vibrant, and trustworthy images.
Editing for perfection
Even the best shots benefit from subtle editing.
Post processing should enhance rather than alter reality. Adjusting exposure and contrast can refine balance, while fine tuning white balance ensures accurate colors.
Sharpening details like fabric textures or product labels makes the image pop.
Background distractions can be cleaned up with tools in Lightroom or Photoshop.
The final edit should look polished but realistic, reinforcing customer trust by ensuring the product looks as it would in person.
Shooting for consistency
If you are photographing multiple products, consistency across all images is essential.
Natural light changes throughout the day, so choosing a specific time to shoot ensures uniformity.
Many photographers prefer mornings or late afternoons when light is soft and stable.
Keeping camera settings consistent and using the same shooting spot for each session helps maintain a cohesive look for an entire product catalog.
Experimenting with creativity
While consistency is important, creativity gives your product photography personality.
Experiment with golden hour for warmth, or incorporate artistic shadows for lifestyle shots.
Try flat lays for storytelling or play with reflective surfaces for unique compositions.
Natural light offers endless opportunities, and the more you experiment, the more you develop a personal style that stands out.
Final thoughts
Mastering product photography in natural light is about observation, control, and creativity.
By choosing the right location, shaping the light with simple tools, keeping backgrounds minimal, experimenting with angles, and refining images in editing, you can achieve professional results without expensive equipment.
Natural light is accessible, authentic, and endlessly versatile, making it one of the most powerful tools for product photography.
If you are a business owner, creator, or aspiring photographer, learning how to use daylight effectively will transform your product images and make them not only visually stunning but also more persuasive in driving sales.
Embrace natural light, practice consistently, and let your products tell their story with clarity and style.

Subscribe to never miss a post!
Leave a Reply